Pages

Sunday, January 29, 2012

Bridal Show 2012

Today was the Qantum Mix 96.7 Bridal Show at the Auburn Hotel and Conference Center. I met so many brides (and even some grooms!). Thanks to Lisa Sampson for her help with my display!


Reed Alexander from Mix 96.7


Gorgeous cake made by Cakes by Tania!

Monday, January 16, 2012

Lights, Camera, ACTION!

Lights, Camera, ACTION!

Ok, the action has begun, but how do  you CAPTURE the action without it becoming one big blur? Great question! Of course, it depends on the type of camera you have and what you are shooting. Typically, you are not allowed to use flash photography for the safety of the performers, so you have to know how to use your camera's other settings to get good shots. Today's info will be on stage photography.

My oldest daughters are in their school's show choirs and when they compete, they are in constant motion and they are under stage lights. To me, that is one of the hardest arenas to photograph because the lighting is not the same in each part of the stage. In other words, depending on where your subject is standing, your photos will come out differently.  For the past 4 years, I have worked at getting the perfect (well, as close to perfect as possible) shots of them and their choirmates (is that even a word?).

If you have a camera with the "running man" icon, choose him. That will work well many times. I shoot with a Canon 5D Mark ii. I put the ISO on 6400 and the last time I shot them (no one was injured, I promise!), I chose the shutter priority setting. Here are some of my photos:


Here, my lovely daughter, Ansley, is in place waiting for their show to begin. Snap LOTS of photos when the action is paused! I used a zoom lens (300mm) so that I could get the kids on the back row as well as the ones on the front. There are lenses that get even closer! Maybe one day I'll have one of those!


Now THAT's action! In the past, this would be a blur and I would get so mad at myself! I was pretty happy with how this turned out. I would have liked to have caught it when more of the girls' faces were showing, but I wasn't quite fast enough.


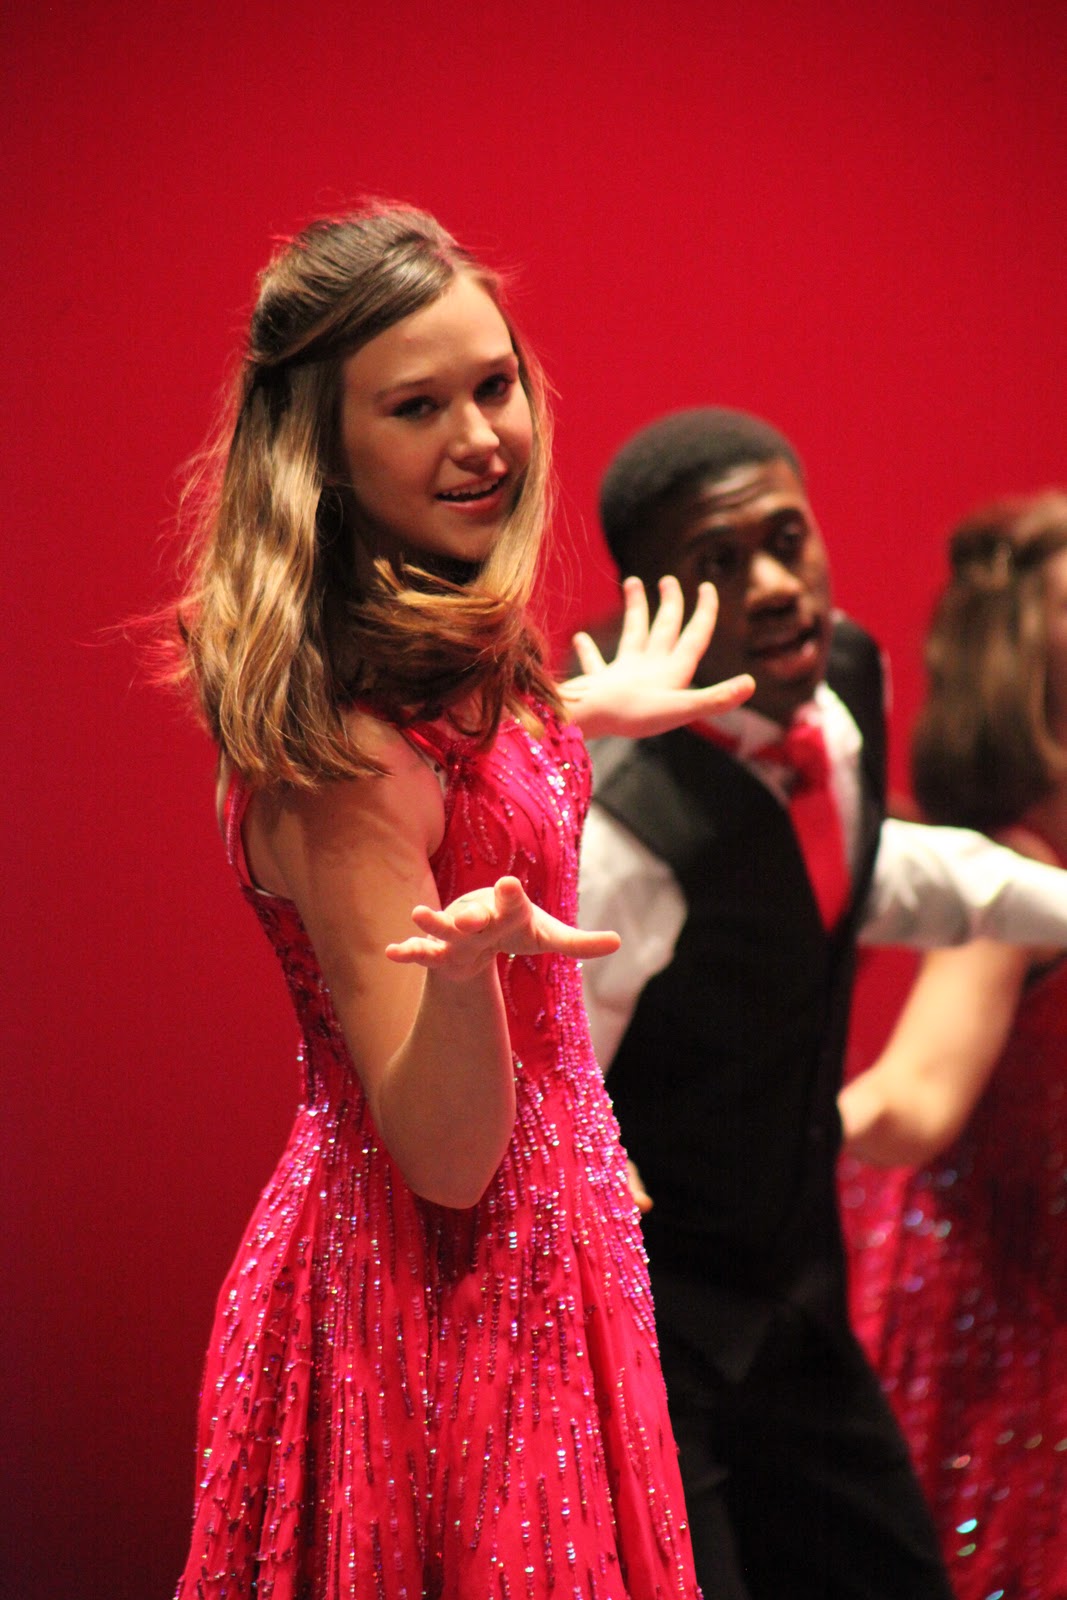
Can you tell that Meg and Matthew are in motion? Look at her hair! It is flappin' in the wind!


Ansley's hair!


I have also used a Canon T2i with a zoom lens to capture show choir photos. It did a good job, but not quite as sharp as the 5D. The color is not quite as good, either. Here are some of Hayden that I took last year with the T2i using the "running man" icon:


Look at the lighting here (above). Hayden is toward the front of the stage where there is less light but look at the guys and gals behind her-they are in bright light. Stage lighting can be tough!


When you are shooting stage photography, it helps to ask questions beforehand. It helps to know what part of the stage your subject will be in if you are going to be shooting one particular person. While my daughters are on stage and I want to get photos of them, I am also shooting the other members of the choir. I attend their dress rehearsals so that I get an idea of what their show will be like and then try to position myself a little bit off exact center due to the microphone placement. That way, I can get a pretty good view of all the members of the group at some point of their show. You can't move around at these events, so stake out your seat early!

I hope this helps you with getting some action shots under stage lighting. You can see more of my show choir photos on my Facebook page.

Happy Shooting!
Andrea:)


Wednesday, January 11, 2012

What is bokeh?


What is bokeh?

Thank you to Tracy at Prop Insanity for this lovely Valentine bokeh how-to!

How To DIY Heart Shaped Bokeh.. just in time for Valentines Day!

Bokeh... from Wikepedia
In photography, bokeh (Originally play /ˈboʊkɛ/,[1] play /ˈboʊkeɪ/ boh-kay, and also sometimes heard as play /ˈboʊkə/ boh-kə,[2] Japanese: [boke]) is the blur,[3][4] or the aesthetic quality of the blur,[5][6][7] in out-of-focus areas of an image, or “the way the lens renders out-of-focus points of light.
BOKEH it’s a technique that 99% of us photographers ADORE!
So why not be creative with it, really use it as a full prop in your photography sessions.
Here at PI, we put together a quick tutorial that will hopefully help us EASILY grasp how SIMPLE this lil trick can be… ready for it?
WE thought so!
First of all.. here are some samples to get you grooving into your bokeh mood…
#1 by our Fabulous own Lindsey Mills…
Ps, you should check out her facebook page, Click Here for some prop inspiration, and see all of her heart shaped bokeh shots…
Now here are a few of my own shots, with a pull back below…
First… blowing heart shaped kisses!
(when I did my edit above… I 1) burned out the Christmas light wires and than 2) painted over the hearts that were out of the “kiss blow” area)
Next…
Baby Love!
(again, I burnt out the wires for the lights…)…
Its very similar to our HOLIDAY BACKDROP how to,
just shooting with a lens cover in the shape of a heart.
So, here it is…
Now, how easy is this? SIMPLE DIMPLE!
Well, it’s a million times easier than I originally thought it to be.. I guess it just looked more dramatic than the process actually is… so here is the groove junkies…
First of all.. you need to do a simple cut & paste with your lens…
CUT into a black piece of paper a small heart shape
(for a 50mm lens, the shape should be roughly 25mm in size).
Then cut the paper to match the circumference of your lens and tape it directly around… as seen in the picture below
(or head to PhotoJoJo to buy precut shapes!)
(sorry for the ho’dunk image above lol)
Second, set up your lights (Christmas lights are great!) in the background
(I clipped them right to my black backdrop)…
Next, place your subject 1/2 way between you and the backdrop.. remember, bokeh works only when you have a foreground subject to focus on..
leaving the lights in the background to BLUR bokeh style.
Lastly… set your camera to its lowest aperture… a 50mm lens is best for this, using as wideopen as you can (1.8-1.4 is fabulous).. and SHOOT!
Now if you’re like me, your still confused on how this happened?!
Yep, I fully admit.. I’m NOT book smart,
I  need to SEE a pull back to understand how it happens.
Some basic questions… ANSWERED!
Is this s a composite of 2 images?
Nope, you are using 1 image… shoot through your “new lens”
(shape attached/taped to front of lens)
and shoot directly AT your subject (not the lights).
The lights in the background will then blur (bokeh) and give you hearts.
YES you can see right through that tiny heart to your subject :)
I’m shooting through the lens, but all I see is a vignette?
You need to make sure you have a foreground subject.. shooting the lights directly wont give you any bokeh, hence no hearts.
I dont have a 50mm, what can I use?
Even if you dont have a 50mm, a lens with as low as 2.8 is still good, you just have to set your subject further away from the backdrop so you get the bokeh affect.
How do you cut the shape?
I simply bent my paper in 1/2 and cut the heart shape,
but you can buy small shape punchers at stores like Michaels crafts etc

Looking for more great info on this subject? 

Check out this video tutorial by Michael Warf, Click Here
Or this great article from DIY Photography, Click Here,
and if you want some real great ideas, check out this flickr search… Click Here .
There is inspiration everywhere!!!
And who doesnt LOVE LOVE LOVE some fabulous bokeh?!

Sunday, January 8, 2012

Why do photographers charge what they do?

Thank you to Love By CC for this awesome post!

Why do photographers charge what they do?

Have you ever wondered to yourself "Why do photographers charge what they do for newborns?" or "Why does it sometimes take FOREVER to see my pictures?".


I was chatting with a good friend of mine, who is a newborn photographer, and I was wondering the same thing. She and I started talking about the process she goes through to get to the end result. It made me appreciate photographers and their process so much more!

Here it goes:

Newborn sessions can last 4 hours or even longer! The photographer usually has a bunch of props that they have purchased, sometimes specifically for your newborn photo shoot. They spend their time taking pictures and posing the baby. Most of the time, the baby wakes up during the session so they have to wait a little while in between to try to get the baby to sleep as well. Once the photographer gets all their photographs, you'd think they may be finished, well they aren't! This is why you aren't able to see the images immediately, lets get into that...


The session is over, now the photographer has to go through dozens of images to find the right ones. From there, they edit each and every one, taking anywhere from 7 minutes to 20 minutes for each photo. If you have 15 photographs in your album and each one takes 20 minutes to edit, that is an extra 5 hours on top of the 4 hours your photographer took for your session! Totaling 9 hours!


After the photographer has done the session and edited the photographs, they have to set up the gallery. In between that, they are answering your calls and emails about how to order, etc. When you order, the photographer has to place the order with the printing company. To order with the printing company, they have to crop, re-size, and add logos, which can take anywhere from 45 minutes - 2 hours. They also have to check the order to make sure it is correct when it comes in and some make post office runs to ship it to you!


Lets appreciate all our photographers do for us! They really work hard and give us memories that last a lifetime ♥♥♥


If you are interested in reading a story and letter that makes you appreciate more about photography and the memories, click here to visit a blog and read a story that brought tears to my eyes..

**Thanks to Jennifer Lea Photography for supplying the photos and the information :)

Thursday, January 5, 2012

I love cardiologists!


I ♥ cardiologists! My sweet dad had heart surgery today, and I am so thankful for his brilliant doctor. I have a very grateful heart~ Sweet Heart Cupcake fromSweetopia.
Thanks to my sister (www.party-wagon.com) for putting both our sentiments into words!

Wednesday, January 4, 2012

Basic Digital Photography tips

Want some great tips on how to take better pictures? Try this site...http://www.basic-digital-photography.com/index.html
Basic-Digital-Photography.com explains some of those fancy photography words so that a regular person can understand them! Check them out!